Figure 1
Linguistics 580
General Phonetics
Louis Goldstein
1. Before launching Praat, you should set the input gain for the microphone that you are using. On a Mac, this is how go do it. Go to the Apple Menu and select System Preferences, and among the available panes, choose Sound. You will see a Panel with several tabs along the top, labelled Sound Effects, Output, Input, etc. Click on the Input tab. Click on the sound source you will be using. When you do so, the level meter below should start to show activity when you speak into the microphone. You should try to put your mouth about 5-10 inches from the microphone. Ideally, you want the recording level to peak about 3/4 of the way across the meter and you can adjust the Gain slider so as to achieve this. When you have finished this, close System Preferences.
2. Launch the Praat application.
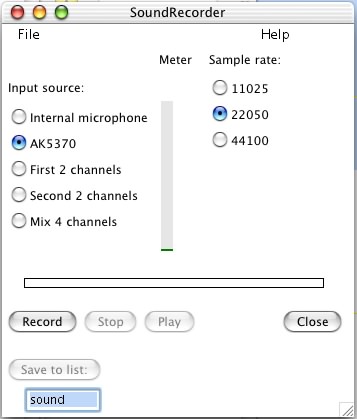
3. From the New menu, select Record Mono sound...
4. Set the recording conditions in the panel like Figure 1. Input source: Click the Radio Button next to the appropriate source. For Sample rate: click the radio button next to 22050. if it is shown. Otherwise you can use the default or 44100 .
5. When you talk into the microphone, you should see the meters in the middle of the panel move--soft sounds are green and near the bottom of the meter, loud sounds are red or yellow and near the top. When you are ready to record, Click the Record button and speak. When you are done, click Stop. To hear what you recorded, and to determine that it is all right, click the Play button. If you not satified, click Record again. When you are finally satisfied, you can the name the sound you recorded in the box at the bottom of the panel (e.g., sonnet since the example that I use in the rest of these instructions is the first line of Shakespeare's Sonnet # 114), and then click To list: That will send what you have recorded to the list of Praat objects where it appears as Sound sonnet. Close the recording window.
6. Before doing any analysis, save the Sound to a disk file, just in case. From the Write menu, select Write to AIFF file... In the resulting dialog box, the default name should be Sonnet.aiff, which is a good choice. Save it to the desktop. Then click OK.
1. Praat allows you to divide up the sound signal into temporal stretches or intervals, and to assign text or labels to these intervals. It does this by means of what it calls a TextGrid. The basic idea is that one might want to divide a signal into intervals in more than one way. For example, one might want to divide it into intervals corresponding words, syllables, and phonetic segments. Or as we will do in our next exercise, into voiceless and voiced intervals. The different ways of dividing the same signal are referred to as tiers in Praat .
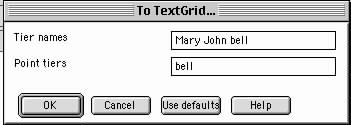
2. To begin to divide a sound signal into intervals and label them, select the sound signal from the object list in the Praat Objects window, then click the Annotate - button and select To TextGrid... A dialog box like that in Figure 2 will then appear. This allows you to name the tiers that you will be using (and indirectly determine the number of them). Edit the Tier names box and replace the names there with the name of the tier or tiers you intend to use. For example, here we will break the Sonnet sentence up into intervals corresponding to the successive words. So we replace Mary John bell with Words. (Ignore the point tiers names). When you click OK, a new object appears in the list--a TextGrid object, with the same name as your sound object (eg., TextGrid Sonnet).
3. To divide the waveform into intervals and label them, select both the Sound object and the TextGrid object (by holding down shift while clicking on the object names). Then click on the Edit button. A waveform window will appear, but now with a yellow blank box (tier of labels) below the wave that can be used for marking intervals and naming them. (If more than one Tier name had been specified (See 2 above), there will be one box for each tier name. Selecting an active tier can be done by clicking in the corresponding box.)
4. When the waveform cursor is moved to a particular time, a vertical grey line appears at that time point in the current tier box with a little button at the top of the line, as shown in Figure 3. Clicking that button will create an interval boundary at that point in time, which shows up as a blue line in the tier box (except the currently active boundary which appears in red).
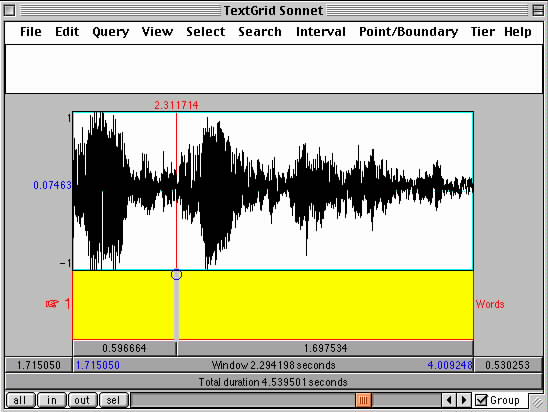
5. When two such interval boundaries have been created, you can select the interval between them by clicking on the tier box between the two boundaries. Pressing the tab key will play the corresponding interval. A name can be assigned to the interval just by typing while the interval is selected. The corresponding text string shows up in the tier box, and also in the blank space at the top of the window below the menu bar. In the latter location, the text associated with the interval can be edited using standard editing tools (cursor placement, cut, paste, etc.). Figure 4 shows labelled intervals corresponding to the firs three words of the sonnet ("Let me not"). The currently selected interval is the middle one--the word "me." Note that "me" appears in the space just below the menu bar, as well as in the the appropriate interval of the tier box. Note also that the duration associated with each interval appears in the top play bar.

6. To save the interval locations and their labels, go to the File menu of the Editing window and select Write TextGrid to text file... The default name will be the name of your sound object with a .TextGrid extension. The saved TextGrid can be later read into Praat along with the corresponding sound file. Or select both the sound signal and the TextGrid and from the main Praat window, select Write to binary file... from the Write menu. This will save everything to a .Collection file.